Monday, December 14, 2009

progress

Hey, ladies... hope all is well in your world this beautiful December day! It's been more than a few days; however, I have progress to show you. Here is the total quilt as it stood last weekend. Of course, it's still in pieces and chunks, but you can get the overall idea. I'll be putting narrow borders between the outer blocks and the center portion, but I'm not sure of the fabric yet.
Total quilt - half way

Here's the center portion, all pieced together now. I've added leaves to the trees, as well as short stacks of beads and leaf beads to give it some depth and life. I also added a couple of button clusters in the upper reaches of the tree. I will probably add at least one more, but I'm not sure where it will reside.
Center - eglantine

Here's a closeup of some of the work on the tree. I spent ALOT of time doing buttonhole stitch leaves!!
Tree closeup

Along the twisting runners and vines I have added vintage sequins as eglantine (sweet briar rose).
Ferns and eglantine

Now we are moving on to the blocks along the right and left borders. Here I've added a tall grass bunch to try and make it feel like you are peering through the grasses on the edge of the glade. Sort of. ;0) Anyhoo... here is the right border. I'll be putting a spider web and associated spider on the upper right portion of this bunch of grass. This is couched round satin cording.
Right border blocks - grass

And here is the left hand border, with another bunch of grass. This is some type of piping that I sewed on with beads. This bunch is slightly shorter than the right hand side.
Left border blocks

Here is a closeup of this clump of grass with the addition of the crocheted leaves on the bottom. I'm putting these crocheted leaves all along the bottom of the quilt. My vision is working so far! WooHoo!
Crocheted leaves

I have accomplished more this past week but have no pictures to share yet. I'm getting there! I'll try and update later this week and show you what further additions I have made. Love ya'!

Monday, November 23, 2009

How I spent my vacation

Hey, ladies, howze it goin'? Hope everyone is in fine fettle and stitching away!

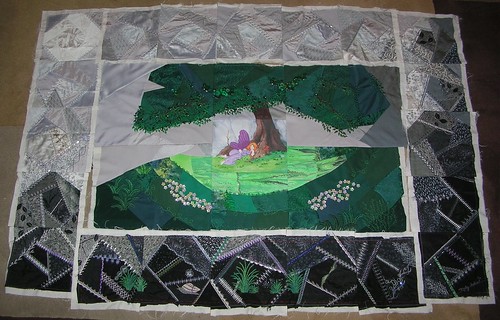
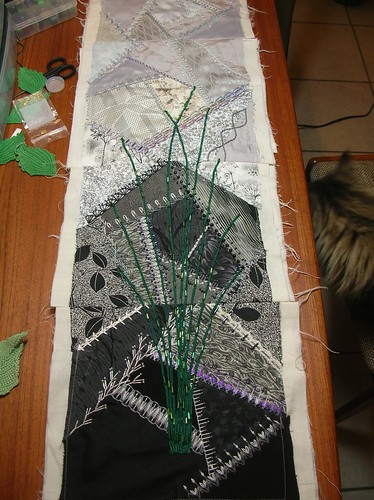
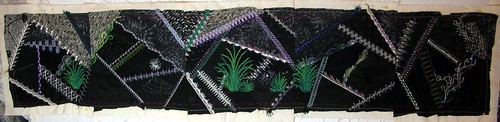
I'm back from vacation... well, I was back 3 weeks ago actually. But, then, as usual, I was sick for a week after our vacation and then life kinda got in the way. I think that long involved road trips will no longer be a part of our vacation plans... too trying on this aging body! We had a really good time... well, most of the time anyway. I got quite a bit of stitching done on the tree. Lots and lots of buttonhole leaves...
Leaves on tree - left
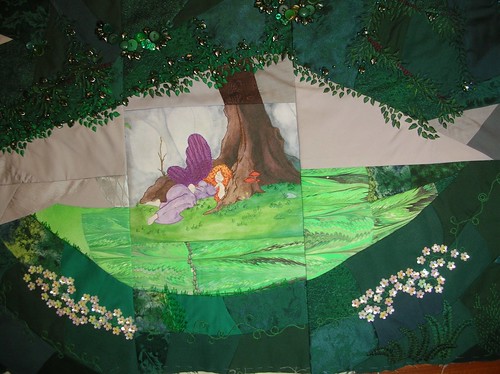
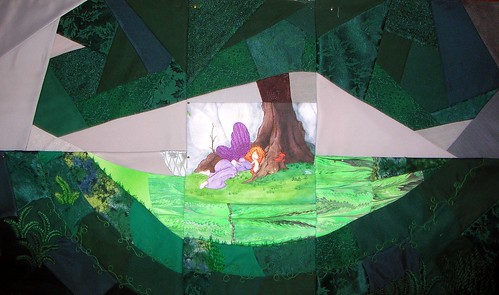
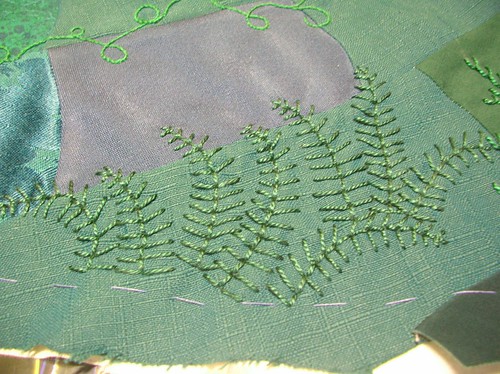
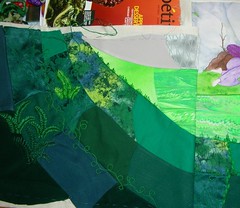
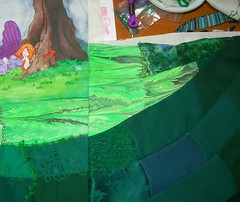
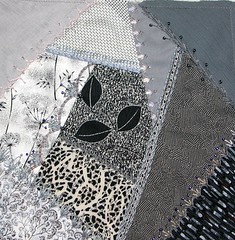
This is the left side of the tree....

Leaves on tree - center
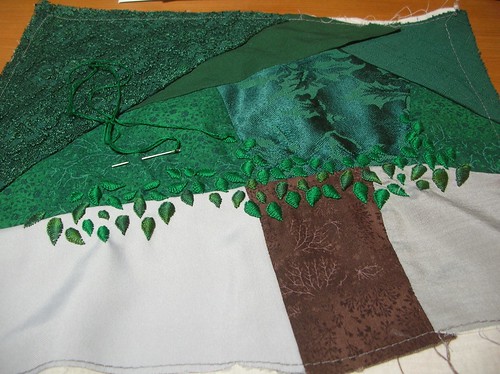
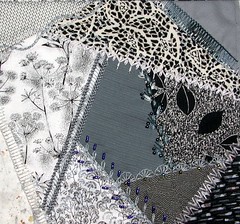
and here is the center portion...

Leaves on tree - right
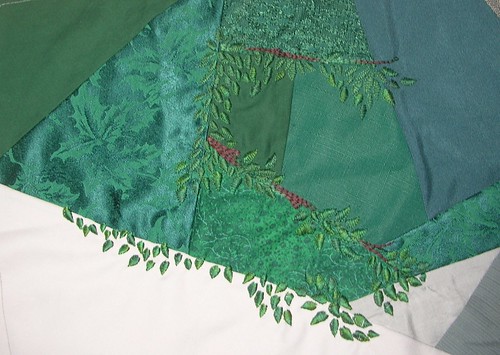
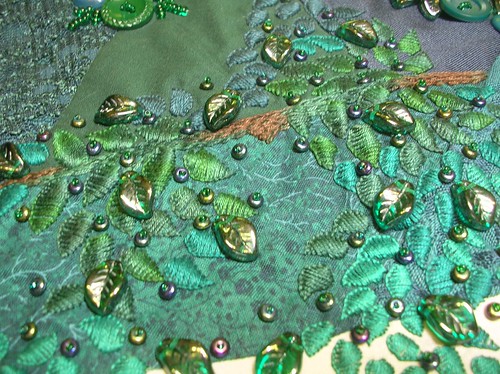
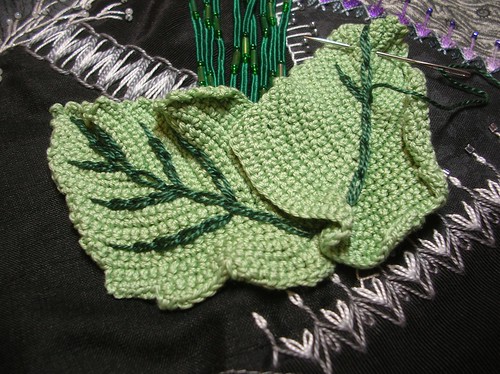
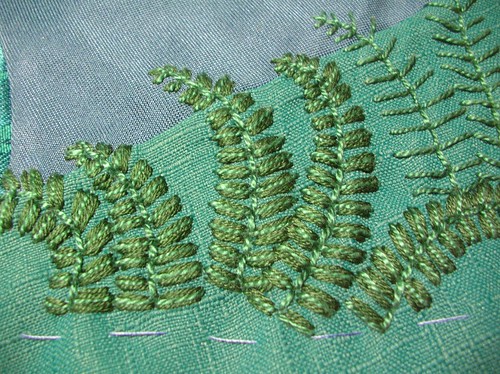
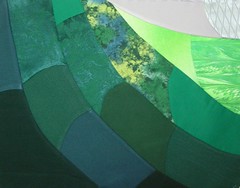
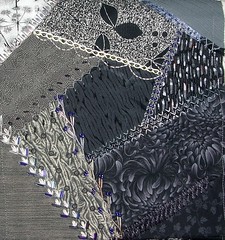
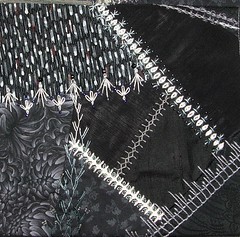
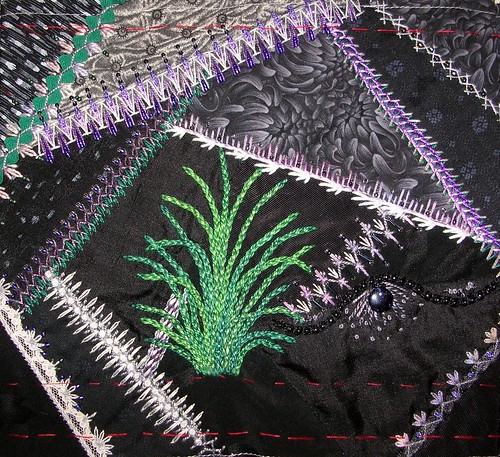
Then we have the right side of the tree. I've been using some variegated threads I found at my local needlepoint shop for the first pass across the blocks. Here's a closeup of the leaves so you can see them a little better. As always, you can click on the picture and it will take you to Flickr where you can pick a larger size to look at if you wish.

Tree leaves closeup
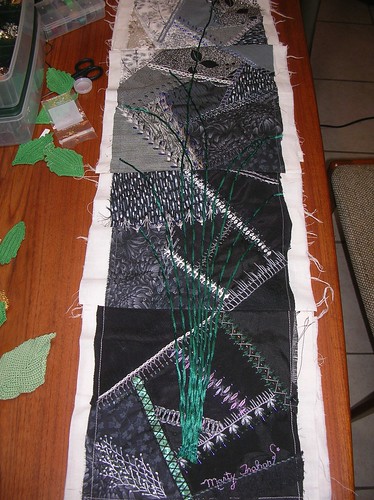
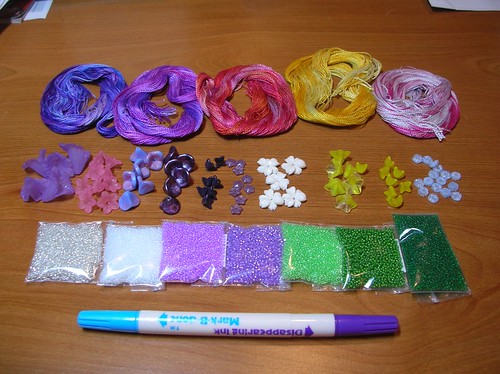
This is a little blurry but I think you can tell what I have been doing. This was all done while I was on vacation. I stitched all the way across Texas, all the while I was at my mother-in-law's house and then I had to stop. I wore a hole in my needle-pushing finger and couldn't stitch anymore! Where was my thimble, you say... why, it would be at home where all good thimbles hide out. I was rather upset that I forgot it because I missed some quality stitching time!

Here is something else I was rather upset about...
Fluid & cowling
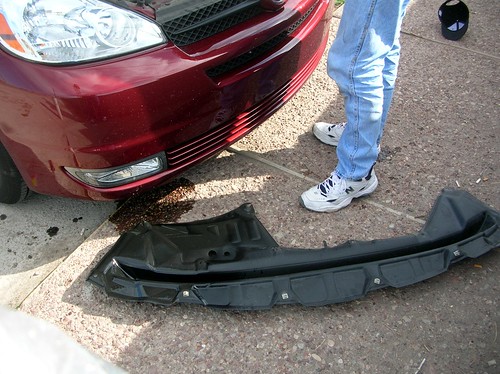
This is at a rest stop in the middle of Texas... see that little puddle underneath the van? That would be the power steering fluid leaking out of the hole we found out was in the power steering line. The cowling that you see there, that big black thing? That is supposed to protect the engine from stuff popping up from the road. Well, whatever popped up from the road went right through the cowling, partially ripping it off, and then right through the power steering line! Gah.. what to do? Well, Glenn took off the cowling and we headed for Houston. Pretty soon we started hearing this terrible noise in the front of the van and we stopped at tiny gas station in Van Horn, Texas. We ground to a stop and there we sat. We couldn't start the van because something seemed to be all frozen up. Glenn called a Toyota dealer in San Angelo and found out that the belt he was looking at only powered the power steering pump so... he used a knife and cut off the belt! We gingerly turned the key and the van started right up! WooHoo! Off we went again with a frozen power steering pump, and consequently, no power steering... for another 300 miles. Long story short, we had to get the power steering pump and the belt replaced in Houston. What a mess!

Happy 35th Anniversary to us! Oh, yes, this all happened on our 35th Wedding Anniversary. Ah... the joys of the road trip! Luckily, I was so involved with getting everything ready for the trip with all the important things like piecing my quilt and sorting threads and beads that I didn't make reservations in San Antonio like I wanted to. We stayed with Glenn's sister for an extra day in Houston while the van was fixed.

And now, if I was a good blogger, I would be telling you about how I visited with Debra in Houston. I'd tell you all about her beautiful work that I got to see in person and I'd show you the goodies I brought to share with her. However, once again, I was so focused on getting things ready for the trip that I FORGOT that she lived so close to Houston! I didn't remember until we were headed back to Phoenix and by then it was too late. I was sooooo mad at myself I couldn't see straight! Sometimes I'm such a twit! My apologies, Debra! Next time!

OK, that's enough for now. I've made some further progress on the tree and I'll show you that in a few days... no, really! Only a few days!!! :0)

Saturday, October 17, 2009

Robin Atkins comes to Phoenix

I had the distinct pleasure of attending a 2-day Improvisational Beading class taught by Robin Atkins. Wow, was it an eye opener! So much to learn and so little time... but I gave it a whirl! She started us out with the basics and then moved into more advanced stitches. First we practiced on a trial piece and then we moved into making our own pieces. More about that later!

I took a few pictures; however, I was too shy to take a picture of Robin while she was teaching (didn't want to disturb her) but I did get a great picture of her hands as she told us about her "Marriage Bag."
Robin's hands
As she taught us the different advanced stitches, Robin would bring around examples of her work to show us how she had used that particular stitch. It was a wonderful way to see how the stitch looked on a beaded piece, as well as a great way to get up close and personal with the artist and her art.

Here is another of her pieces that I just love... Rosie!
Rosie!
Isn't she something else? There is so much going on with this little lady! Here's a close-up of her garden...
Rosie's garden

As you can see from Robin's post about her visit here, there were some talented people in that class. Apparently Lisa has a new love!

As I said earlier, by afternoon of the first day everyone was working on their own personal beaded piece. I started in on mine and got quite a few beads embroidered on it and then Robin said she wanted to show the class my piece... as she took it she said "I hope you don't take this wrong, but..." Oh, dear. Then she used my piece as an example of how improvisational beading should not start! Hoo boy, not the impression I wanted to leave her with! But I soldiered on and got a bit more improvisational with it instead of making it so symmetrical and I think she was a bit happier with it at that point. So was I!! I could see that I had planned it out in my head instead of being spontaneous and just letting it flow the way she had shown us. Wanna see it?
My piece
I started it with the buttons and then added the rhinestone beads around the top button and it was altogether way too symmetrical. The bottom part is where I actually started just beading without a plan. I like the way it is going and I'm going to use it as a practice piece as I work through the beading on my Midsummer CQ.

Oh, yes, there will be scads of beading around Titania! I think the techniques Robin taught during those wonderful two days will really help to bring some dimension and extra emphasis to many areas of the center portion. I can't wait to dig into it!

And, speaking of the center portion... all blocks have been pieced! WooHoo! ;0)
Center blocks pieced
I had such a hard time piecing the tree... it took every evening of the past week. The center block and the left block took 4 evenings, then, this morning, I got up and pieced the top right block in 3 hours. Quite a steep learning curve! Of course, I can see where I need to do some revision on the piecing here and there but at least you can now see the idea that was in my head! On my monitor, these colors are pretty true. When I first envisioned this, it was going to be much softer, lighter tones; however, when the muse speaks, I listen! Of course, this is just the base and there will be many additions along the way!

We're off on a long road trip for the next couple of weeks, but I'll be stitching the entire way... WooHoo! Va-ca-tion!!

Tuesday, October 06, 2009

Still here!

I am still here! I've been doing some stash enhancement in anticipation of doing the final embroidery and beading on the center piece of the Midsummer Quilt.

Sassa lynn threads and beads
I bought some Sassa Lynne threads and some beautiful ribbon from Maureen's Vintage Acquisitions.
Ribbons

She had the colors and the selection I needed all in one place which is nice. I also bought some flower beads and size 15 seed beads off of ebay and etsy... some place else, too, but I can't remember where... ah, I remember! Bead World... that's where I got them!

Leaf beads
I also got these leaf beads at Bead World. They have a pretty nice selection of flower and leaf beads there.
Green bead mix
This is my green bead mix I made up, along with some vintage flower sequins I'll be using quite a bit. They have a lovely irridescent shine to them!

Work has been a bear lately and we've also had company in town so it has been hard to get some major quality embroidery time in; however, I've actually managed to get a bit done, believe it or not! I wanted to show you how I was doing the ferns in the corners. I started them with just a fern stitch, but it seemed way too sparse and not very fern-like at all. I decided I needed to fill in the leaves alot more so I just started adding straight stitches alongside the lines of fern stitch. Here is the plain fern stitch...
Fern stitch

and here is the fern stitch with the straight stitches added in to make it more "ferny." (Yes that is a word!) (maybe...)
Fern stitch filled
I've used different greens for the various ferns and it has helped it to seem more... ferny! ;0)

We are going on a road trip in a few weeks and I want to get the whole center pieced so I'll have it with me to fill the hours on the road... and sitting on the couch in my mother-in-law's house. ;0) I'll be back in a day or so with the tale of how I spent my weekend! It was fun!!!

Thursday, September 10, 2009

Still working away on the Midsummer CQ

Although I've been quiet on this little blog, I have been working away on the Midsummer CQ project. I've decided that 2.5 years is long enough and it WILL be finished by the end of the year!

So, without further ado, here's what I have been up to. When last we left Titania she was wingless and indecisive. Due to popular opinion, including my own, I went with the plain purple wings and here's where we stand today (click to embiggen, then go to all sizes):

Titania with hair embroidered
I fused her wings to the block and then couched some lovely purple sparkly braid around the outer edges to help with the fraying. I also stitched some tiny metallic thread to emphasize the shape of the wing as well has help hold the fabric down (it didn't fuse very well because of the wrinkles). Then, I backstitched with teeny tiny stitches all the way around her dress and hair as well as the tree. Her hair is also backstitched throughout to try and give the impression of lots of curls (we are rather fond of curls in my family!). Getting this far has helped me get a good feel for how everything in the center portion will work but I won't do any more until she is brought together with all the other center blocks.

And, speaking of center blocks, here are the three bottom blocks of the center portion. I set them up so you can see how they will fit together:

Center to left bottom blocksCenter to right bottom blocks
I used Allie's curved piecing method to give some flow to the picture. Of course I haven't seen her do it in person but once I got going it fell into place pretty quickly. At least it did for the left and center blocks... I waited a couple of weeks before I did the right hand block and had to completely re-learn how to do it! I think once I have lots of foliage and flowers and sprinkles and fairies and all that lovely stuff added it will look pretty good. At least I sure hope so! The vines curling around the long seams are running stitch and I plan on adding some leaves and flowers to them. In my mind's eye I see those vines curling through the grasses and ferns on the edges of the glade, rather like bindweed. I just started working on the ferns this week and am really enjoying figuring out how to add depth and life to them. They are done with fern stitch and lazy daisy stitches. I'm so looking forward to exploring this forest glade!

I've also nearly completed the beading of all the seams of the outer blocks. I've been taking each section to work and beading during my lunch hour. Everybody oohs and aahs over it, then says I'm crazy! Yup, that would be me, crazy for crazy quilting... LOL!!

Yesterday I hit Bead World here in Phoenix to pick up some leaf and flower beads. That place really makes me drool! I barely managed to control myself but I still spent too much, as always! Ah, well, they will be lovely on the quilt!

OK, that's about it for tonight. Take care, lovely ladies, and hope to "see" you soon!!

Tuesday, August 04, 2009

Piecing and which wings?

I have managed to get some piecing done... finally and at last. I took the lower left hand block of the center and began to work on it, feeling my way along, trying to make it work. I wanted to do several things with the center portion. I wanted to
- use colors that allow the Titania block to blend in rather than stand apart
- follow the curve of the light from under the tree to the outer edge
- use Allie's curved piecing method
- make the seams of the pieces curve to mimic grass and foliage

This is what I came up with:
Lower left block in center portion.
It's 11"x15" and it took me awhile but I think I managed to do what I wanted to do. When I got it finished I was rather taken aback at how bright and intense it was... I guess I have been working with neutrals for so long that the color was rather shocking! Here's how the upper right corner of this block matches up color-wise with Titania's block:
Titania up against fabric
I'm pretty tickled that I was able to blend it so well... hopefully I will keep my matching mojo going. ;0)

Meanwhile, I have been playing with Titania and adding some details and shading here and there. I used colored pencils to intensify the colors on the tree, deepen the shadows and give a little more life to her face with eye shadow and lip color. Then I ironed the whole block to set the color. I've never used that technique before but it worked quite well and really made a difference.

Next, I started working on her wings. I wanted to really get the feeling of Titania's block set in my head and to do that, I need to give her wings... so to speak! I had some marbled fabric so I played with that first:
Titania wings A
I reaslly wanted this to work but I think they might be a little bit too much. They kind of take away from her rather than add to her. Here's the second try:
Titania wings B
This is a textured fabric I picked up somewhere and I like it alot. On this one I laid the wings back a little bit, thinking that that's how they would be if she was sleeping. I'm not sure about that part, but I do like the fabric. I also tried some white organza but it completely disappeared against the background so I didn't even take a picture.

I've been looking at these so long, though, that I can't really see which would work anymore. So, which one do you like better and why?

Monday, July 13, 2009

Hello, darlings... nice to see you...

it's been a looooonnnnnngggggg time! (Name that singer!)

I've been working on my Midsummer CQ... beading all the outer blocks. It has been an interesting journey, going back over the blocks and really seeing the stitches on the seams again. The beads I've chosen have been matched pretty closely with the background fabric. There have been some purple and green added in here and there because I want to pull the center colors out into the border a bit. Here are the blocks I've been beading, from lightest to darkest:

Beaded block 1
This is the block closest to the moon on the left side. I used iridescent beads on this and it really sparkles in person.

Beaded block 2
More iridescent beads along with some opaque ones since this is farther from the moon.

Beaded block 4
This is back over on the right side where it's a little darker.

Beaded block 5
As I look at these in closeup, they really arent't very good pictures. Sorry 'bout that! You can kinda see the beading though, and I knew if I didn't get a blog post up soon, I never would!

Beaded block 6
Getting quite dark now, moving farther down to the forest floor.

Beaded block 7
This one is nearly at the bottom so it is even darker.

I've so enjoyed going back over these blocks as I beaded them. I look at some of the seam treatments and think "How the heck did I do that?"... too funny!

I was supposed to piece the inner portion over the long 4th of July weekend; however, my sewing room was such a mess that I spent most of the day finding my way to all the flat surfaces! Once I found work space I couldn't get started... I was stuck and didn't know where to begin. I finally started pulling fabrics and realized that I didn't have enough greens.

A couple of Goodwill stops later I had a pretty good selection of green fabrics so I tried once again this weekend to piece the center portion. I still couldn't see how I was going to do it... My first vision wasn't working and it took me hours to really figure out what I wanted to do. Now that I have a reworked vision to go with, I'm hoping I can get started this week. I did manage to pull the muslin backing out and begin cutting it to size... that's a start at least!! ;0)

That's all for now... I've received some lovely squishy mail recently so I hope to post about that later this week. Wish me luck on my piecing, it should be quite the adventure!

Tuesday, June 02, 2009

"After the Ball" is on it's way!

Made it! I squeaked under the wire and got my entry into the Alliance for Quilts "Crazy for Quilts" contest.
Complete
I kept the smaller embellishments to a minimum in order to emphasize the main design elements. The ones I did use I kept close to the color of the background. Supplies used on this piece include vintage linens, lace, pearls, crystals, buttons, sequins and gloves. Soie d'alger silk floss and perle cotton, along with a few beads made up the seam treatments. I had a couple of problems with the finishing but I'm hoping it will be accepted. If it's not, that's OK too! I learned so much in the finishing alone that it was worth doing.

Here's a close-up of the Lady herself.
Lady corner
There's a bit more buckling here than there should be but all in all, I like it! As always, click the pictures to get to a larger size. If you want to see even more detail, use the "All sizes" feature on flickr to go to a giant size.

All in all, I learned so very much doing this piece. It has also kick-started my creative self and that's a good thing! Keep your fingers crossed that it's accepted into the contest!

Later, ladies...

Tuesday, May 26, 2009

"After the Ball"

What a weekend! I spent nearly 25 hours this weekend working on my Alliance for Quilts piece, "After the Ball." I'm so glad it was a 3 day weekend! ;0)
Partially finished
This addition of gloves to a CQ project is an idea that has been percolating in my little brain for awhile. I knew I could weave a story around a pair of gloves, and when I saw this lovely lady and her hand mirror, everything clicked in my head.

The gloves have been slipped off and her jewels have joined them. She gazes pensively into the mirror and, once again, feels the music and his touch on her arm...

I think I may have read one too many historical romances! :0)

Anywho...

I've fixed the parts of the button detail in the corner that were bugging me. It "feels" much better to me now. The major components are all here, now I just need to add all the pieces that pull it together.

We spent the weekend before in Colorado with the kids and the grandkids. It was a whirlwind 5 days but it sure was fun. I'll treat you to a couple of pictures... after June 1st!! I have to go do some beading now.

Hasta!

Tuesday, May 12, 2009

Alliance for Quilts continues

Hey, ladies... how's everyone today? For those Mamas out there, I hope everyone had a wonderful Mother's Day! I got a call from each of the boys so that made it a banner day for me.

I've been working slowly on my entry in the Alliance for American Quilts "Crazy for Quilts" Contest. Time is passing rather quickly, though, so I need to get my butt in gear! Here is the lovely lady that will reside in the upper left corner of the piece:
Top left block
I finished the barely visible seams and added pearls around her picture. I'm pretty tickled that they came out so well, with no blank spaces and in perfect order! I'm not sure how I'll finish off the doily since it isn't perfectly round. A spray of flowers might be in the plan somewhere, though.

Here is the lower left block:
Bottom left block
I placed a button cluster in the outer corner. I think it needs some help but probably won't do more on it until I have them all sewn together. Here's a closer look (click to embiggen):
Button cluster closeup
The left side needs to have a vine trailing out across the seam to balance it out, I think. We'll see!

Here is the lower right hand block:
Bottom right block
If you think the piecing is a bit wonky on these, you're right. I decided to use a method other than the center first piecing method, just for fun. Probably not the smartest thing to do for an entry in a contest; however, I need to keep pushing myself and learning so I keep myself interested and engaged. That being said, I find this method harder than starting with that little five-sided center bit of cloth, that's for sure!

Ok... off to keep stitching... hope I get it done in time!

Wednesday, April 15, 2009

Anybody there???

Hello??

Tap... Tap... Tap... is this thing on?? ;0)

Believe it or not, I've started stitching again. I've decided to enter the Alliance for Quilts Crazy for Quilts contest as a way to jump start my creative self. I've set aside the Midsummer Quilt for now to concentrate on the Crazy for Quilts contest. I need to reconnect to crazy quilting and bring something to completion. I need to immerse myself in all the lovely bits and pieces that make up today's crazy quilt. Midsummer is still very much in the back of my mind and I'll return to it soon, hopefully with renewed vigor and creative spirit.

This is the focus block of the quilt:
M' Lady
This is a transfer from an eBay seller that I fused to a doily found at a local antique mall. I love the way she looks like she is dreaming of the future!

I'm piecing it completely in vintage linens that I've picked up here and there. It's been nice to use some of them on this project, they seem to match perfectly with the tone of the piece. Colors will be mostly pink with green here and there. I can't wait to really get into it!

I'm feeling much better now, I'm actually able to stay up past 8:30pm!! WooHoo! ;0) I feel a bit like I've finally pulled myself up out of a rather deep hole. The past 8 months of not really being able to think and being so tired have taken a toll on my job performance and, well, let's just say I've been concentrating on rebuilding my boss' confidence in my abilities. 'Nuff said on that subject!

I'm committed to working diligently on this project, finishing it and then moving forward to the Midsummer Quilt. I hope you will all come along for the ride!

I'll be back in a few, ladies. Take care and be creative!

Thursday, March 12, 2009

Long story short...

Hey, ladies... so glad you are still hanging around my little bit of the blogosphere!

The above title refers to the fact that my continuing tiredness has finally been diagnosed. Over the past two months, we have been through the ringer medically. I had some wonky blood tests come back over a period of several months and my family doctor thought I had lgl Leukemia. She set me up with a hemotologist/oncologist and ordered an abdominal ultrasound to check for an enlarged liver and spleen.

The ultrasound then showed an unknown mass in my liver. A followup MRI was inconclusive so I had a PET scan done which showed I didn't have liver cancer or any other tumors anywhere, which is a good thing to find out when you are 56! The mass was just "fatty infiltration" which comes from age, alcohol (ahem) and being overweight (double ahem).

Then I had a visit with the oncologist who said "no, it's not leukemia, you have a virus of some kind, we just have to figure out which one." More blood tests of ever deepening intricacy showed that I had Epstein Barr virus, although it is not currently "active." It just makes me so tired I can't see straight. It is believed to be the cause of mononucleosis and a precursor to chronic fatigue syndrome. Oh, wonderful... just what I need. ***sigh*** Anyway, I'm still tired but I don't have cancer, so YAY!

Well, that wasn't a really short story, but I see you folks as my friends and I wanted to let you know what has been going on... hope you don't mind!

I have barely touched Midsummer since my last post. I got some more beading done on the seam treatments this past weekend, but that's about it. Last night I did lay the bottom row of blocks out on the coffee table and played with positioning some embellishments and some of the crocheted leaves. I'm hoping the playing will get me moving again on it. Keep your fingers crossed! ;0)

I'll be back in a few days. Take care, my ladies!

Saturday, February 14, 2009

Wherein a snail is finished...

I finished the snail last night and I must say I am pleasantly surprised at how much I like it. ;0)
Snail finished
I used beads for the body to give it the shine of the snails body in real life. I wasn't too sure about getting the beading to come together without tooooo many gaps but it actually worked. WooHOO!

I used some more of the Waterlilies silk floss for the antenna. I used about 6 strands and then couched it down in a spiral fashion with more of the silk. It gives a unique look to the couching and I think it will appear again somewhere on this quilt 'cause it looks really cool! :0) ETA: Please excuse the kitty hair in the large version... heh.

Anyway, just a quick post to show you lovelies the finished snail. We're busy listening to some music - Lynard Skynard, Chris Isaac and Mary Chapin Carpenter so far... (we are nothing if not eclectic in our musical tastes) while we clean house. Have a great weekend!

Monday, February 09, 2009

Still stitching!

I hope all you ladies have had a great weekend! We had nearly half an inch of rain here in Phoenix on Sunday so it has been a lovely, misty moisty weekend for us. We don't get too many of those here so we really appreciate it when we do!

I've added a few more bunches of grass to the single one that was there before. Here is a rather elongated picture... I think you'll have to click on it to see it in any viewable size.
Bottom row - grasses
It's not a great picture since I had to stand so far back... but you get the idea. That tuft of grass on the left was looking a little lonely so I have since added another, smaller, tuft just to the right of it. Pictures next post. As I look at this, I see I'm going to have to remove that squiggly green seam treatment above the left hand tuft of grass... it looks kind of out of place!

If you look closely, you'll see the outline of a snail just under the little starburst stitch. This is supposed to be a kind of forest floor picture along these blocks so the snail is quite large compared to the grasses, which are just baby bunches, really. Here's a close-up of the snail outline.
Snail outline
I found a picture of the kind of snail I wanted, one with a really nice big shell. Then I traced the outline on some tissue paper and used that to stitch through so the outline was transferred to the block. I used a varigated silk thread to do a padded satin stitch for the shell. The padding was with #5 perle cotton (I'm not completely crazy!) and the satin stitch itself was done with a 12 strand silk (Caron Waterlilies) that really has some good reflective qualities. I used just one strand of the silk floss so it took me four evenings to get done, but I really enjoyed doing it.
Snail shell in satin stitch
You'll see a break in the stitching about 2/3 of the way back along the shell. I'll be adding a line of beads there, as soon as I can find the perfect ones. I think it came out pretty good. I started at the back tip and worked my way forward. The sections I did later are definitely better than the first ones... it's been awhile since I did satin stitch! ;0) I'm not sure what I'll do for the body of the snail... still thinking about that one.

That's all for now. I'm still not feeling well and I'm really tired most of the time, so this post is rather short. Take care, ladies!!

Wednesday, January 21, 2009

Yesterday, Embellishments and Titania

Wasn't yesterday a proud day for the US? Democrat, Republican or Independent, you have to admit we have come a long way, baby!! ;0)

I've begun adding more embroidery to the bottom border. I took a deep breath and began a clump of grass in the center of the middle block. I decided on the grass because I wanted the center portion to be a little taller than I was getting with the bunches of leaves. I used Caron's Watercolours in two different shades of green. First was a darker green for the bottom layer of chain stitch. I liked the varigations that resulted but it looked flat. Now if I had my act together, here you would see a picture of just the chain stitch; however, I don't have my act together, so you get a picture of the grass bunch after a second layer was added. ;0) I worked a row of back stitch on top of the chain stitch using a lighter, yellower green to pop it out a bit.
Embellishments - Block 4
The second layer adds quite a bit of depth to it. Here's a closer look.
Embellishments - Block 4 Grass
I'll leave it here for now 'cause I don't want to overwork it. I can always add more later! That bottom row of red basting stitches you see is the final seam line and the row just under the grass bunch is the line I'll use to keep my embellishments on an even keel. I'd be really ticked off if I had to rip a bunch of stuff out because it was heading downhill!

Last weekend we made an unscheduled stop at the Flea Market and I found some goodies. In the last post I was bemoaning the fact that the crocheted leaves I had were such a light green. Well, guess what I found??
Doilies with leaves
Two different doilies with two different shades of green leaves on them! WooHoo! These will add some interest to the bunches of leaves.

I also tried my hand at printing on fabric. I bought some Bubble Jet Set and used a variation of Allie's instructions to print a picture of Titania. Because I didn't have any full-size label sheets, I tried it with freezer paper and it actually worked! See?
Titania Final on PFD Cotton
This is printed on cotton and I'm not too sure that it is as nice as it can be. The picture is crisp; however, the fabric is a little bit "fuzzy" (especially on the tree) and I think I may be able to get a better result on silk so I'm gonna give it a try this weekend. Of course, she isn't as big as I originally planned, so I had to revise the center design a bit. I think it will work out just fine whether I use the cotton or the silk.

So, that's where I am now. I'll be back in a few days with more. Take care and have a great week!