Sunday, September 30, 2007

What we did on our Sunday afternoon

The previous homeowners left us this lovely "bush" that was beginning to block the driveway, so we decided to cut it way back today.
Olive before

Glenn was cutting and I was hauling...
Olive during

after much cutting and much hauling, that huge 10 foot wide bush was gone, leaving in it's place...
Olive stump
a tree stump. Oh yeah... that's nice. Not!

I think Priss had a better idea...
Priss
napping is always a better idea! ;0)

Now, a hot shower and a good supper and back to stitching! Hope you all had a more relaxing Sunday!

Wednesday, September 26, 2007

Forging ahead


Block 1B, originally uploaded by Marty52.

I'm blogging this using Flickr's "Blog This" feature, so we'll see how this goes!

Three more seams done. I especially like the gray and purple one in the center section. I'm out of practice at doing seam treatments so it has taken a bit to get back into the swing of things. I added my name as a seam treatment, since I wanted it in the lower right hand corner of the quilt. There's probably a tradition that the quilt shouldn't be signed till you are done with it but I didn't think of that till I was almost done with my name.

I noticed as I was stitching that I had missed a crossover on the green ribbon, so I tried to fix it and only succeeded in making it worse. Oh, well... that's what buttons, beads and lace were made for - covering up the mistakes! ;0)

We have been having glorious weather here in Phoenix. It was in the 80's on Sunday and it was fabulous. We got out and worked in the yard off and on. More off for me since I am so out of shape! Got some pruning done and dug up some seedling mulberry trees that were in the gardens (they sprout everywhere). I also pruned up the ginormous 50 year old junipers that hover over the front walk so the mailman doesn't get his hat knocked off while Glenn mowed the lawn. It was soooo nice to get outside without the stifling heat!

This year we hope to rework the front yard... or at least get a start on it. We need to remove a couple of trees that have seen better days, plant a couple of new ones and decide if we are going to put a small patio out front and enlarge the sidewalk. We have to think long and hard about it because anything we do needs to really enhance the house so it increases in value. We won't be retiring in it so anything we do has to be done right.

The next thing on the agenda is to figure out the ultimate fate of the kitchen. It's driving me crazy and I've decided I need to start seriously thinking about it. Now I just have to find an online kitchen planning tool to play with. Anybody used one that they really liked??

Saturday, September 22, 2007

Ooooops!!

Edited to fix the mistook on the TAST link. Double oooops! ;0)

********************************

I was talking with my son Nat (he's painting Titania for my Midsummer Night CQ) this week... HI NAT! and all of a sudden he said, "I think we have a problem."

Erm... what problem?

Well, he read my blog entry about my vision for this CQ, and after taking a good look at my crude rendering of the quilt, and reading the comments, he realized that my vision and his vision didn't exactly match. It seems that the vision in my head was so strong that I guess I just assumed that Nat would be able to read my mind and know that I was looking for the entire body of the sleeping Titania... his painting was just a torso... oooops! Apparently I didn't do a very good job of explaining the my ideas... oh, well, live and learn!

So, he's starting over on the painting. There is definitely a silver lining to this cloud, though. He is much more familiar with how the fabric paints work and I can show him a picture of the fabrics and colors I plan on using in the center blocks. So, here they are, Nat. These are the colors I will be using (click to embiggen):
Fabrics for center blocks
About 95% of these are vintage silk kimonos and I'm really excited about finally getting to use them in a quilt. Since Nat will be working off of my existing colors, I can go ahead and piece the inner blocks if I want to. So, all is good!

Here is Block 1 as it stands tonight.
Block 1A

Here's a close-up of the Half Chevron Stitch (Week 26) for Take a Stitch Tuesday (TAST)
TAST - Half chevron
and the Cable Chain Stitch (Week 36)
TAST - Cable chain stitch

These are very simple seam treatments; however, I'll be adding beads and other goodies later as the block comes together. I can see now that there will be lots of new techniques to learn while making this quilt... I am so looking forward to it!

Wednesday, September 19, 2007

Stuff and things

Good Afternoon, ladies! Hope you're having a wonderful day.

I've started embellishing the seams on the first block of the Midsummer CQ. Not much to show yet, though. I should have something picture worthy this weekend. Originally I was going to use just blacks and greys but VERY quickly realized that the threads were so close to the fabric colors that the embellishing would only show up upon very close inspection. Well, after all the work I'm going to put into this baby, I want somebody to be able to see it, dontcha know! So, I'm adding subdued colors to the black blocks, too. This "work in progress" is going to be changing constantly I can tell!

As you ladies in the comments rightly guessed, I was a tad worried about appliqueing over the seams because of the bulkiness. However, after doing the first couple of seams, I've realized that they aren't that bulky and the applique would probably do fine over them. Also, as Jo noted, it would be rather tricky to keep the flow going along the seam. So, I'll do the appliques after the seams. I think I might also pad the appliques a bit to give the impression that some leaves are closer than others. We'll see.

I've never done any real applique before and although it is a relatively simple exercise, I need all the help I can get! I picked up Applique - the Basics and Beyond. It's got several different methods in it and I'm looking forward to playing around with them to find the one I like best. Do any of you have a preferred method for applique?

Since I was book buying, I picked up The Art of Embroidery: Inspirational Stitches, Textures, and Surfaces Oh, this is a yummy book. I'm hoping to sit down with it tonight and give it a thorough going over. It has lots of ideas for reproducing natural textures in embroidery. I'm hoping it will help me enhance the landscape portion of the quilt.

In other business, Glenn and I did some wardrobe enhancement this past weekend. End of summer sales are the best! ;0) Glenn found two more outfits for work, plus some new shoes; however, I really scored. I got 5 or 6 outfits for wearing around the house, and I needed them sooo badly. Since we moved to Phoenix I've taken to wearing tank tops and capris because I can stay much cooler that way, but I only had a few. Not any more! Now, if I can just find some work clothes, too, I'll be set. I guess we'll have to do some more shopping...... darn.... ;0)

Wednesday, September 12, 2007

Midsummer CQ Explained

I thought I would explain my concept for the Midsummer CQ, as I seem to have caused some confusion. The quilt is based on Shakespeare's "A Midsummer Night's Dream" and specifically, the scene where Titania, Queen of the Fairies, is sleeping in the forest.

Here's the scene:

Imagine yourself sitting at the edge of a forest... you can see some grasses and flowers right in front of you, with some of the more unsavory forest inhabitants peeking out at you, banned from Titania's presence... everything just past that is in darkness. The moon has risen and is flooding the sky with light. Gradually, you see the trees part, as if you can see clear to the center of the forest. Why, there's Titania, asleep in the glade, light shimmering around her... the air sparkles with fairies and fairy dust as they watch over their Queen. Flowers and twining vines in all sorts of colors surround the glade and beautiful butterflys and moths flit silently about in the warm, scented air. It is a magical moment on "One Midsummer Night."

That is the feeling I'm going for. Have You ever seen the movie Legend? While it wasn't the greatest movie ever made, it has some wonderful visual contrasts between the world above full of love and happiness and the dark underworld below. That is the kind of contrast I'm going for in this quilt. Not so much the good vs evil part, but the bright and beautiful vs the dark and subdued. See what I mean?

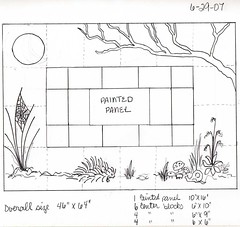
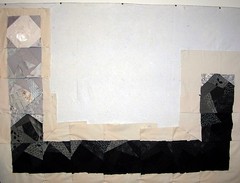
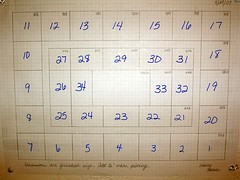
Now, I played around and managed to come up with a rather rough picture to help illustrate how I will be approaching this quilt on a fabric and thread level. Bear with me here because this baby was started in Microsoft Excel, then marked up as a PDF and converted to a JPG. I think it gets the message across anyway.
Midsummer plan B
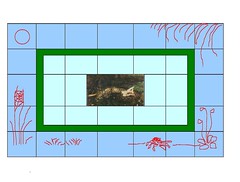
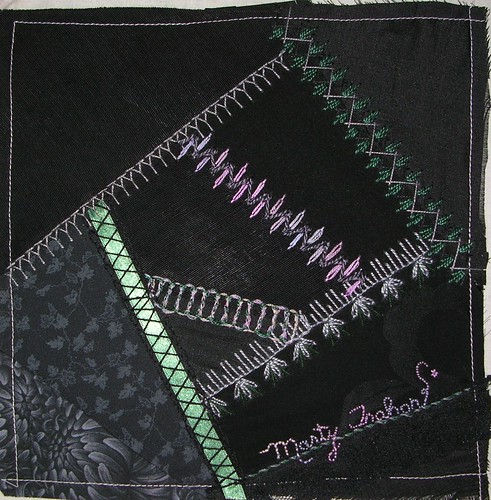
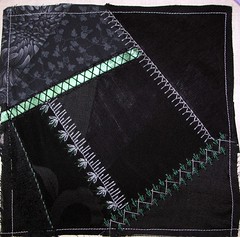
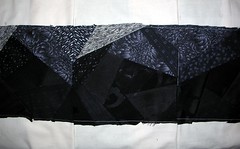
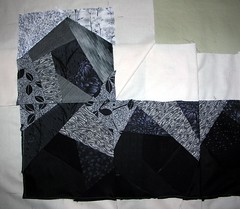
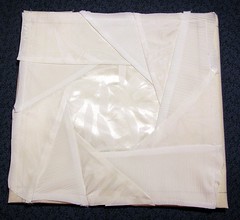
The outer ring of blocks in blue are the blocks I have just finished piecing... seen below:
Border blocks pieced

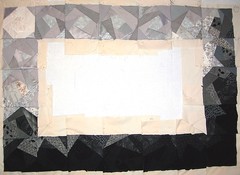
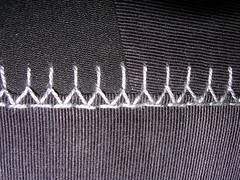
I'm going to place the grasses and flowers with their inhabitants directly on top of this border - embroidered and appliqued and anything else that works to get the idea across. I've been thinking that I need to do this first, before I embroider the seam treatments because if I applique, it will look funny when it goes over the embroidered seams.

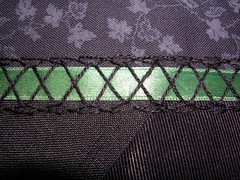
The dark green border will be the edge of your view as you look into the forest. It will probably be a dark, dark green, probably with a vine entwined around it (quite obviously this idea isn't firmed up yet).

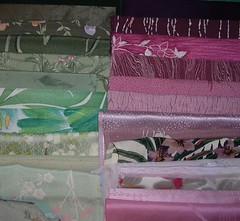
The next set of blocks, shown in light green, will be the forest glade surrounding Titania. It will be a very colorful set of crazy quilt blocks, heavily encrusted, with lots of greens and pinks and purples (I think) with the flowers and vines, fairies and fairy dust, sparkles and sprinkles, and butterflys and moths all over the place. The panel in the center will be a painted Titania that my son is finishing up this week.

So, I hope this is a good explanation of where I am going with this project. It's definitely a long term project, I'm hoping to have it done sometime next summer!!

Monday, September 10, 2007

Midsummer Border Blocks Pieced

Getting started on the final piecing for the border this weekend was a challenge. I was getting all wrapped up in making sure the values were the same on all my fabrics and I couldn't get my head wrapped around it. It was very strange. I kept plugging away at it and finally on Sunday I think I got to the point where I said "screw it" and after that every went along just fine! The last 3 blocks took no time at all and I was done... whew...

Here is the border completely pieced at last.
Border blocks pieced
All in all I think it worked pretty well. As I embroider all the seams I will be able to blend the fabrics into a more cohesive background... really looking forward to working those seams!

These border blocks are smaller than my original plan so I'm going to have to adjust the type of embroidery I do when I get to that stage. Here's the original plan in case you have forgotten... from two months ago... sheesh!
Design 4
In this earlier version the border blocks were 12" (~30cm) wide which left lots of room for additional embroidery. The border as it stands now has 8" (~20cm) blocks so the corresponding area for embroidery embellishment is smaller. I'm still going to do embroidery, though, since that is a big part of the quilt concept of a Midsummer Night's Dream. However, since I have LOTS of seam treatments to embroider first, I'll think about that somewhere down the road!

Thursday, September 06, 2007

Midsummer Night - Take 2

I moved the quilt blocks to the design wall Tuesday night and played with fabrics until I had the ones I wanted for the next two blocks. Then last night I sat down and started piecing as soon as I got home from work. I pieced two more blocks... the ones between the lower left corner and the moon. I also decided to go with the moon centered on the block and added some pieces to the corners to round it out a bit. Embroidery will soften the edges and add the halo around the moon effect I'm looking for. Anyhoo... here are the top left three blocks...
Top left 3 blocks

and here is the quilt as it stands now, pinned on the design wall (click to get larger sizes).
Full view - 12 blocks done

If my calculations are correct (and this is ALWAYS in doubt), it will end up somewhere around 42" X 62" (106cm X 157cm). I have decided to put an inner border, as Rian (I believe) suggested when I first unveiled the design. My original thought was to have the inner blocks kind of meld into the outer blocks; however, after much thought I have decided that the border will frame the inner blocks nicely and provide a window affect for the forest scene. I don't know what I'll do on the border, but some thoughts are percolating! In fact, they are percolating a bit too much, I woke up last night for my nightly stumble to the bathroom around 2am and then couldn't get back to sleep because I kept going over the quilt and it's design in my head and couldn't shut it off. I finally had to get up and have some milk (with Hershey's syrup - puts me to sleep everytime) and settle myself before I could go back to sleep. Too many more nights like that and I'll be about worthless!

More progress in a couple of days, ladies!

Tuesday, September 04, 2007

11 down, 23 to go!!

Ah... such a great weekend! I played in my sewing room all weekend... about 6-8 hours every day for all three days. It was great!

First, I consulted my final plan:
The plan

pulled piles of fabrics:
The fabrics

and sorted thread, ribbons, laces and beads into carry-along cases:
Thread, etc

Then, I took a deep breath on Sunday morning and started sewing. I started with block 1 on the lower right-hand corner and worked my way across. I got blocks 1 - 7 done on Sunday and then started in again on Monday. Here's the right hand corner:
Bottom right corner

and the middle blocks:
Bottom center blocks

and the lower left corner:
Bottom left corner

The lower right corner is the darkest since it is farthest away from the moon. Then the blocks grow gradually lighter as they move across the quilt. I don't have an overall picture but you get the idea. Right now it is laying on the guest bed but I'll probably move it to the design wall tonight and maybe I can get a full picture then.

Before I went any further, I decided I needed to get the moon block done so I could get the right mix of fabrics going in the blocks that will lead up to it. Doing this block took awhile... I was initially going to applique the moon onto an already made block but then I decided to play a bit. I sat and thought about it and had a snack... then I got on the computer to find a polygon that would work as a moon. Turns out what I wanted was a decagon, a ten-sided polygon with enough area for seams that would still give the appearance of a circle. So, a couple of hours later, we have a moon of silk from a vintage kimono:
Moon block
I really like how it came out, although I'll probably add some slightly darker pieces to the corners to continue with the circular theme. I may also offset it from center a bit in the final phase... we'll see how things work out.

By the time I finished the moon block I was so tired that I was cussing at my machine. That's when I decided it was time to stop and let it go for the night! I've used 20 different fabrics so far, with many more to go. I can't wait to get back to it this evening!

So, 11 blocks done, 23 to go! Stay tuned!