Saturday, September 23, 2006

Ta Da!

A quick post to let you know the pillow is done... I'll do the edge beading while we're driving north. It came out pretty good, I think. Unfortunately, the place where I had to leave it open to add the filling kinda looks scrunched compared to the rest. I think once it is beaded this area should blend in OK though.
Pillow
I wasn't able to come up with a novel way of attaching the rings, but I think this will work. (Click for bigger picture as always.)

Here are a few details:
J for Josh
J is for Josh, the groom.

B for Beth
B is for Beth, the bride.

Together finished
Together as one!!!

Here they are dressed Old West style on a visit to Tombstone, Arizona this spring:
Josh & Beth - Tombstone
They both have super curly hair... their kids are gonna hate them for that! LOL!

We leave in the morning for the drive to Colorado... hopefully I will be able to blog from my son's computer but I'm not sure. Wedding pictures as soon as I can!

Wednesday, September 20, 2006

Falling Behind

Getting this pillow done by the weekend is going to be almost impossible but I'm gonna try. I have spent too much time looking at it and trying to figure out what I want to do next and what it was about it that was bothering me. I figured out the bothering part... it was the big button. ::sigh:: It stood up too high from the surface of the pillow and, since I'm not doing a bead and button trail anymore (another change) it didn't work by itself.

So now we have another button that really isn't a button. It is a broken Mother of Pearl pin I found at a flea market:
MOP Button
I've been hanging on to this beauty for quite awhile also. Here it is in context, along with the reason there won't be a bead and button trail...
Together
I like the idea of "sentiments" on handwork that is being used for a special occasion, don't you?

Here is the fan with it's beading completed, along with the date of the wedding.
Sep 30

And, lastly, here is another reason I haven't gotten anymore stitching done:
Sienna front
Too many hours have been spent researching, looking, finding, talking and finally buying this lovely vehicle... a 2004 Toyota Sienna.

I like it.

Thursday, September 14, 2006

Day 25, Etc.

My rendition of Day 25 is just like Sharon's... except for the colors... and I used pearl buttons... and the sections are separated... well... at least the stitches are the same!!
Day 25
I was auditioning a wide lace to put along this seam; however, I wanted the French seam of the linen napkin to be visible. I was looking thru Sharon's 100 Details and this seam treatment just jumped out at me. I was able to bracket the French seam with the two parts of the seam treatment. The Japanese pearl buttons are from the Fifties.

This is a button that will be featured along this seam. I have had this button at least 15 years. I guess I was saving it for something extra special! I think it will work well as the pivot point of a button and bead trail.
Beautiful button

This is a fan that started life as a crocheted doily. It was my grandmother's but was pretty badly stained. I decided that having parts of it be seen and loved was better than leaving it to languish in a drawer. But I'm sure there are lots more beads in it's future!
Crocheted fan

And this is an overview of the progress on the entire block... almost done with the seams!
Progress!!

I'm hoping to finally get in the workroom this weekend... I have lots of things I want to make once it's up and running!!

Sunday, September 10, 2006

Seam Treatment Progress

I finally took some time and sat down today to work diligently on the seam treatments on the Ringbearer's Pillow. I had one nearly completed so I just added beads to finish it up.
Seam A
This doesn't really follow any of Sharon's 100 Details in 100 Days but it does incorporate two of her favorite stitches, the straight stitch and the lazy daisy stitch (edited to say that those aren't straight stitches---ahem---those are buttonhole stitches worked on top of each other. What can I say... it was a long weekend and I was tired!). It was really an easy seam treatment and an exercise in seeing how well the tan thread dulled down the bright yellow.

This is a takeoff of Sharon's Day 79, backstitching thru the lace and finishing it up with lazy daisy stitches.
Seam C
Working with lace along a seam is great fun... so much can be done in so many ways! As I look at it now; however, I think I may need to add something along the lower edge. It looks a bit naked!

This seam treatment uses Annie Whitsed's idea of using the leftover long bits of thread from the other seam treatments to make French knots along a seam. This is a nice fat group of knots...
Seam B
I had to restrain myself from doing more "thread doodling" along this seam. That's one reason I think Sharon's Joggles class on Personal Library of Stitchs is going to be so fun and challenging... lots of room to play!

Moving in and getting settled still continues. Some of my boxes of "stuff" have been packed up since 1999, when we moved from Louisiana to Colorado! We've decided that every box will be unpacked and decisions made about the contents. I've already unpacked several sets of dishes of varying sizes, taken digital pictures to be saved to CD, and repacked them so they can be stored for our boys. As much as I love the old family china (Mason's Pink Vista and Mason's Oak) and the set I fell in love with in an antiques store (Wedgwood Ferrara), I don't have room to display it or even store it. So... it's packed up awaiting the day when the kids have a desire for it and room to put it.

All for now... I think I'm back to where I can safely say I'll be stitching a bit every night and I'll be able to post more often. Talk to you later!!

Wednesday, September 06, 2006

Still all Topsy Turvy

Just checking in to let you know I haven't disappeared!

Things are still all topsy turvy at the house, but we're getting there. We still don't have an internet connection but the cable folks are coming tomorrow so hopefully everything will get set up and we'll once again be part of the blogosphere. I can't believe how dependent I have become on the internet! I'm a research kind of person and the internet feeds my need to know something about anything... I've been lost without it. It will be so good to have it up and running again.

I've been working a bit on getting my workroom together... no pictures yet but soon. I had to buy another bookshelf to hold all my cookbooks, gardening books and textile craft books. Both shelves are now full of books with a few left over. No place to put fabric... GACK! Oh, well... some way to store everything will appear.

No more progress on the CQ but I have to get it going since we are now in September and the wedding is the 30th.

More updates with pictures soon!

Wednesday, August 30, 2006

I'm Back with Day 36

Hello, everyone! Still alive and kicking, but just barely. The surgery went well; I'm still a bit sore but there was no cancer so I'm happy. The closing on the house was a nightmare and we had to make two trips to downtown Phoenix because they didn't know there were two sets of loan papers to fill out. (???!??) After two trips there was still one piece of paper that we needed to sign and they sent a courier out to our apartment with that. Of course the courier "got busy" so we didn't get the paper in time for the sale to be recorded that day which meant we didn't get the keys until the next day. In Arizona you can't get the keys until the loan has funded and the sale has been recorded at the Clerk's office. Anyway, long story short, we are the proud owners of a 1950 red brick ranch with seventy-gazillion boxes still full and sitting everywhere! The best part is that I now have a room to use as a studio or workroom or whatever I end up calling it... I can hardly move in it right now but it's all mine! WOOHOO!

And, I finished my interpretation of the Day 36 detail:
Day 36 detail
It's a pima cotton and perle cotton mixture with glass and pearl beads. I love using rick rack so this one is a definite keeper.

Yesterday I signed up for Sharon Boggon's class Personal Library of Stitches at Joggles.com. I just loved her Encrusted Crazy Quilting class last spring (which she is offering again) and am really looking forward to this one as well. It's gonna be alot of fun!!

Well, I'm blogging at work (!) so I better sign off. Just wanted you all to know that I survived and am back to stitching!

Talk to you soon!

Saturday, August 19, 2006

Day 46 of 100 Details in 100 Days

I'm still getting a bit of stitching done here and there. This is my version of Sharon Boggon's day 46 seam treatment:
Half buttonhole, etc
I wanted the eye to move outward from the seam rather than stop so I didn't add the small straight stitches at the top of the straight stitches between the half buttonhole wheels. The half buttonhole wheels are stitched in varigated #8 perle cotton, the straight stitches are 2 strands of silk soie d' alger thread and the rest is various beads, all applied over heirloom lace.

My surgery went well on Thursday... still a bit sore today and feeling the effects of the general anesthesia. I have asthma so general anesthesia affects my lungs a bit more that usual, but I'm getting over it.

Moving preparation and packing boxes continues, although the past few days not much has been packed. This weekend will be mainly cleaning out closets and getting rid of clothes I don't wear anymore. We have our final walk thru Monday evening and then sign our lives away on Tuesday. We should get the keys on Tuesday afternoon or Wednesday morning (we have to wait until the money is wired to the sellers bank). We'll spend Wednesday cleaning and measuring to figure out where furniture will be placed and just enjoying our new digs. The movers come on Thursday and by Friday we should be all moved in and be surrounded by mountains of boxes. I can't wait!!!!

Of course then we'll have to clean the apartment but it's pretty small so it shouldn't take too long. I sure will be glad to see the last of this place... because we are right by the pool it's been like living with a party in our backyard every day and night. It will be good to have our own place again. :0)

Monday, August 14, 2006

Ringbearer's Pillow Top Pieced

Every time I type "ringbearer" I think of Lord of the Rings... Sad, isn't it?? LOL!!!

Anyway, I have the pillow top pieced. It's 10" wide and made out of linen napkins passed down thru my family... both the bride and the groom are chefs and I thought it was appropriate to use the linen napkins for this.
Pieced pillow top
These are small, very simple napkins and we have several sets of linen tablecloths with matching napkins to pass down to everyone, never fear! I've also added heirloom lace to the seams and have begun seam treatments to highlight them.

Here's a closeup of the center heart:
Plain heart in center.
The center fabric is a damask napkin and if you look closely on the largest size (click to make bigger... although I'm sure you all know that) you'll see that I centered the heart on the corner pattern from the napkin. It took awhile to figure out how I could highlight the different weaves in the damask with the heart but I got there!

The wedding will be held in a park in Fort Collins, Colorado and the leaves will have begun to turn to wonderful golden hues so those are some of the colors I'll be using for seam treatments. The wedding gown is ivory with emerald green ribbon across the top of the bodice and laced down the back so I'm also featuring emerald green throughout. The embellishments will be various beads in golds, yellows and greens with pearls and crystals strewn about. My son reminded me to leave room for the rings! Hee!

I'm going to try and come up with a novel way to attach the rings in the center of the heart... it needs to be simple though, so nervous fingers can get the rings off!

All for now!

Friday, August 11, 2006

I'm Still Here!

Unfortunately, no stitching has been done lately. I'm in the middle of piecing a ringbearer's pillow for my son Josh's wedding at the end of September, though... does that count? ;0) I decided I needed to get it pieced in case the move jumbled things up so badly I couldn't find anything. Always a possibility with me!!

Also, I found out I have to have surgery on Aug 17th so that is putting a major crimp in our moving plans. We've decided to try and get everything packed this weekend so I don't have to do anything major next weekend. The surgery is relatively minor but involves general anesthesia and will put me out of commission for a couple of days, another reason to get the pillow top pieced... I'll be all cosy in my recliner and can stitch happily away!

I hope to post a picture of the pieced pillow top this weekend, though. Stay tuned!!

Friday, August 04, 2006

Stitchin' Day 12

Just one treatment today, but it's a goodie!

This seam treatment took me approximately a week to finish since I was concentrating on house stuff but it was worth the wait.
Day 12
The heavier lines are done in 7 strand silk and the thinner lines are #8 perle cotton. Instead of oyster stitches I used a second pearl bead and instead of braid to lace them with I used 6 strands of a Gutermann metallic.

I likes it!

Wednesday, August 02, 2006

New House

It amazes me how much time looking for, contracting for, inspecting and thinking about a new houses takes... there doesn't seem to be enough room for anything else in my poor brain! So... here are a few pictures of our soon-to-be new home (keep your fingers crossed)!

Front (please excuse the trash can):
Full front 2
It was built in 1950 and is just over 1600 square feet in size. Three bedrooms, 2 baths, living room, dining room and kitchen. It has a cement block wall all around the back yard for privacy and keeping the dogs from barking at everything that moves!

Here is the front room:
Front room 1

The "music room:"
Music room 1
with built-in bookshelves:
Built-in bookcases
This is adjoining the front room and it's where we'll be setting up Glenn's guitars and the stereo system. The window seat is wonderful... it has storage all under it... yay!! That door goes to the laundry room... it's inside which is unusual for houses built during this period in Phoenix. Since it doesn't freeze, the washer and dryer were usually in the garage.

The dining room from the front room looking out to the backyard:
Dining room
The tall bearded man is my sweetie... inn't he cute! The fellow next to him is our realtor, Shawn.

Here is the kitchen... this picture is from the real estate listing:
Kitchen
It doesn't have as much counter space as I would like, but it will do until I can convince Glenn that a small kitchen re-do is in order! ;0)

Of course we have boxes sitting all over the place and our cat, Miss Priss, as all cats do, loves boxes... I think she is ready to move!!
Priss is ready!

All for now... stitching should return shortly (I hope!)... it will be soooooo nice to have this all behind us and be settled in!

Wednesday, July 26, 2006

Return to 100 Details in 100 Days

Thanks for the comments on the Tiger Tape Tutorial... I think to some people it may seem over the top to use the tape like this, but it helps me alot and my eye sees discrepancies in spacing very easily and they drive me crazy. Personally, I think this level of anal retentiveness is OK... now... if I also used the Tiger Tape to measure the length of each stitch... THAT would be just a tad too anal retentive. :0)

I've finished two more seam treatments from Sharon's 100 Details in 100 Days... of course I'm behind but I'm still trucking along!

Here is Day 10:
Day 10
I like this one alot... the half-circle buttonholes make a wonderful line and the addition of the extra stitches and beads really fills it out nicely. I can see many variations to the half-circle buttonholes in my future... they are fun to do and create a flowing seam treatment.

And here is Day 16:
Day 16
This, I'm rather unsure of... I still don't know whether I like it or not. I can see that I made the fly stitch loop too long and I think it is too far away from the braid. I tried bullion stitches but because I was using #8 perle cotton they were way overshadowed by the loop and the braid so I used beads in place of the bullion stitches.

I really need some thicker perle cotton.
sigh
I guess I'm just gonna have to go shopping again! :0)

Monday, July 24, 2006

Tiger Tape Tutorial

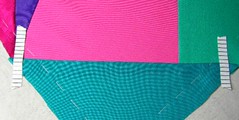
Last week debbie r. asked how I got my stitches so even, and I thought I would show everyone how I do it. I use a nifty little quilting tool called Tiger Tape that I first read about on someones blog (I don't remember who's anymore). I found the tape at my local quilt store, but some of the craft stores might also carry it. I use the tape that is divided into increments of 1/8" because it's the only one I have found so far. Of course, as you can see, you can always order any variation off the web.

Here's how I use it:
Step 1
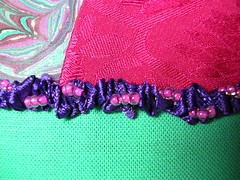
First I position a short piece of tape on each end of the seam, making sure that a line on the tape hits the seam exactly and also making sure I get it placed at a 90° angle to the seam.

Then I add more pieces of tape:
Step 2
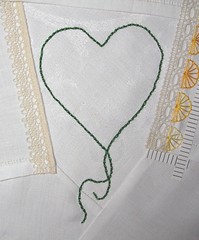
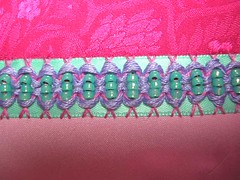
These pieces are placed parallel to the seam and lined up on a mark on each piece of tape at the ends of the seam. Here's a detail pic so you see what I mean:

Step 2 - detail
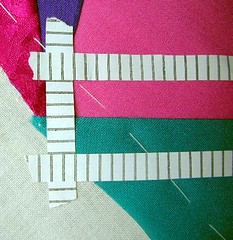
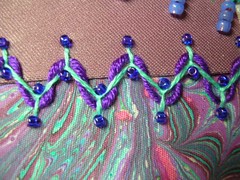
Here's where the 90° part comes in. The tape is lined up so that the marks on the tape meet up with the perpendicular piece of tape. This is done both above and below the seam so that you have a line to work with on both sides of the seam. This configuration is used when you are doing a seam treatment that moves back and forth across the seam as you stitch it.

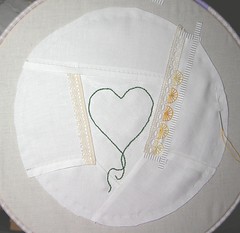
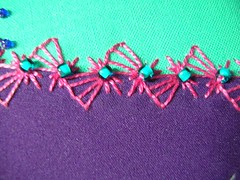
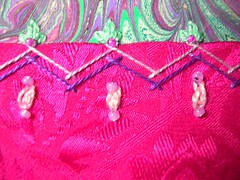
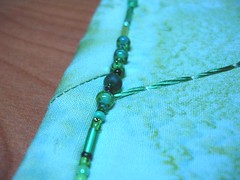
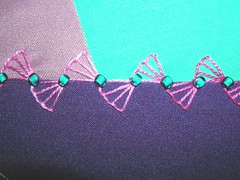
For this seam treatment I was doing one side of the seam at a time, so I moved the bottom piece of tape up so it was close to the seam, allowing me to more easily position my needle.
Step 3 - needle position
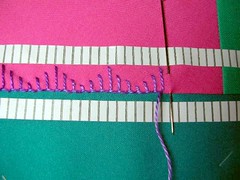
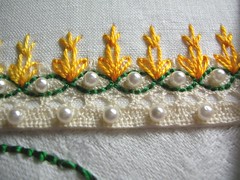
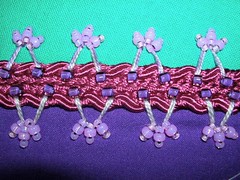
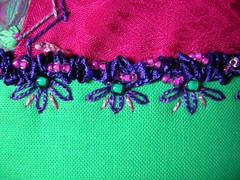
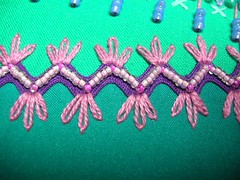
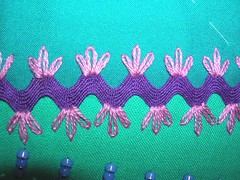
As you can see, it isn't absolutely perfect, but when it's all stitched up and I do the other side of the seam, it looks pretty good!
Finished seam
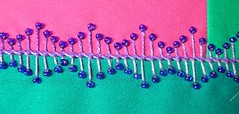
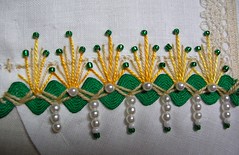
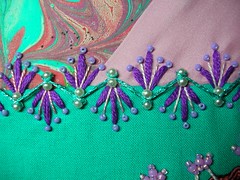
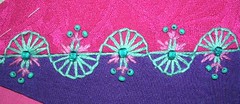
This seam was done with varigated #8 perle cotton and seed beads. Both sides were button-hole stitched and then the bottom of the stitchs along the seam were whip stitched together to even it up more. Then, the seed beads were added.

Other news:
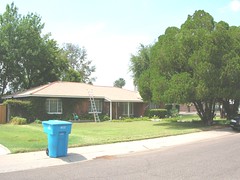
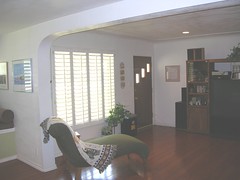
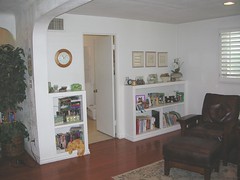
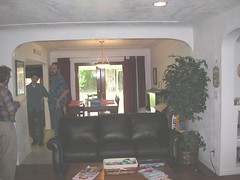
We finally found a house that makes us feel at home and made an offer yesterday. It was accepted and we are sooooooo excited!!!! The home inspection will be this week and I'll post a couple of pictures. Of course we don't get the keys until we close at the end of August, but I'm still VERY excited!! Now comes the sorting and packing, although much of what we have is still in boxes so I'm hoping that I will have time to work on my seam treatments and blog about them.

One can always hope!!! ;0)

Monday, July 17, 2006

The Return of Needle and Thread(s)

I managed to get stitching again this weekend. It felt good to sit and concentrate on my block. Here are the seam treatments I finished:

Ruched ribbon plus
This is the ruched ribbon with an additional line of stitching along it, ala Day 16. The ribbon by itself seemed rather skimpy, probably because I used 1/8" ribbon, so I added some to it.

I also added some to the fans from Day 2:
Day 2 plus
This is just straight stitches but it beefs up the line a bit. It brings it more in line with the vision I have for this wall hanging.

Here is Day 11:
Day 11
The oyster stitches gave me fits... I'm still not sure I got them right but it was time to move on. I used #8 perle cotton and I think I need a thicker thread like Sharon B used to make them look better. Oh oh... I see an virtual shopping trip to eBay in my future... ;0)

This is a variation on Annie's Day 19:
Folded ribbon
This seam is just below the wisteria so I didn't want it to be too overpowering. I may add more to it later but for now it will stay as it is.

And this one is Sharon's Day 19:
Day 19
I really like this one... it is simple but packs alot of punch, especially when gussied up with a few beads...

And, last but not least... here is the finished Block #1:
Seams finished!
Sorry for the blurring... my camera won't go out of macro mode. Anyway, this kinda shows where I'm going with this wall hanging. It will be all about the seam treatments and nothing but the seam treatments. I'm going to use it as a sampler so all these wonderful ideas stare me in the face when I have stitcher's block.

I wonder if I can stick to this idea? Guess we'll see!

Thursday, July 13, 2006

AWOL

Sorry for being AWOL (Absent With Out Leave) this past week. It has been a trying week. When I put the final beading around the binding of my Wedding CQ I couldn't find my Nymo beading thread so I used hand quilting thread. Well, of course after I finished I found the beading thread so... I spent several days going all the way around the beaded binding and sewed the beads on again with the beading thread (and the hanging tabs)... sigh... my fingertips are worn through but the freakin' beads will definitely stay put!! :0)

Then we spent most of Saturday house hunting in houses with no air conditioning (it was 108°) and it just drained us. We spent all day Sunday recovering! I also am just a tad obsessive compulsive and have been spending extra time on the computer combing through the house listings looking for that perfect home for Hubbie and me.

I hope to pick up the stitching again tonight and get back on track. I've been watching everyone else's progress and am anxious to join in on the fun again.

Pictures as soon as I have something done!!

Wednesday, July 05, 2006

Wedding CQ Finished!

WooHoo!! There were a couple of snags encountered but all-in-all it wasn't too bad. First I added a spider, as it is my contention that all spider webs definitely need a spider...
Spider
She's pretty good size (1 3/8 inch) and fits in very well. I considered adding a mate for her; however, as spiders have a tendency to eat their mates, I thought it might be a good idea to leave it off a Wedding CQ. ;0)

Next I added the binding, curiously one of my favorite parts of quilting. I think it's because it all comes together then... you feel the weight of the quilt as it will be and watch the finished product appear before your eyes. Very satisfying! Anyway, the binding proceeded quite smoothly... for awhile. There was a small oops (or four) when I got to the point of ironing it over in preparation for the hand sewing on the back. See what I mean?
Ooops
Yes, ladies, I had a problem. (The color is way off on this picture. Sorry.) The rayon thread that I used for the radiating lines of the spider web had frayed towards the ends on some of them. To make sure they didn't continue to fray, I tacked them down REALLY well. However, as you can see, I failed to put them close enuff to the edge to be hidden by the binding. Now, prior to adding the backing and tying it all together, I had measured forty gazillion times to make sure it was nice and even, square, plumb, and not off in any way. I never even thought about making sure the binding would cover the stuff on the edges properly. SIGH

So, now I had a binding all sewn on that didn't cover what it was supposed to cover... kinda like a mini-skirt. Hee... anyway... I really didn't relish the thought of ripping out the entire binding. When I added the binding I wasn't too sure about how it would look because it kind of just faded away color-wise so I originally considered using a darker green but decided against it. Now my little oops on each edge (oh yes, at least four of them) had given me the "opportunity" to add an embellishment to the edge. So I did.
Ooops fixed
All better! I continued this mixed bead edging all around the binding and it was the perfect finishing touch. Serendipity strikes again!!
Finished!!
TaDa!! I added the tabs at the top instead of a hidden sleeve because Randy is an ornamental ironworker and will be making a special rod to hang it from so I wanted the rod to be seen all across the top of the quilt. Now to package it up and send it off. Wish I could be there when they see it!

Monday, July 03, 2006

Continuing with 100 Details in 100 Days

I've been picking and choosing from all the offerings floating around out in blogland and I've had a great time! Here is Day 3... at least the flower part of the detail:
Day 3
First I couched some cording along the seam, then added straight stitches below the couching, and finally the flowers themselves. The stitches in the couching, the straight stitches and the leaves are Soie d'Alger silk floss and the flowers themselves are french knots in varigated perle cotton #8.

This is my version of Day 4. It took me the longest time to figure this one out but I think I finally got it. I couldn't quite see how the herringbone back-to-back was done but after taking a good look at everyone's examples I was able to make it work.
Day 4
It gives a very clean seam treatment, don't you think? This is 5/8 inch ribbon with the herringbone stitches done in Soie d'Alger silk, as is the lacing.

Here is the finished rick rack seam treatment from Day 2. I was finally able to find some pink glass beads... unfortunately not at a new bead store because it was just too freaking hot at 110°F to go exploring! I'll go another time when it's cooler... like maybe 95°... LOL!!! Anyway... I like the way it turned out.
Updated rick rack

And last but definitely not least... Annie Whitsed's ruched ribbon from her Day 11... I love this detail, although mine is rather more contained than her's... gonna have to work on that free form a bit!
Ruched ribbon
This is done with 1/8 inch ribbon and glass beads.

I'm off work today due to the holiday weekend and the plan is to finish the Wedding Heart CQ... wish me luck!!!

Thursday, June 29, 2006

Day 2 Details

Here are my Day 2 Details:
Day 2 - Rick rack
Here's the rick rack. It's a little bare right now and I want to add some beads; however, I don't have the right color... I want some pink ones. Soooo, this weekend I think a trip to the bead store is in order. I think I'm going to try a new one this time. Should be fun!

Day 2 - Fans
This is the buttonhole stitch fan treatment. Boy... I like this one alot. It's so elegant and spare... unfortunately, maybe a bit to spare... I was thinking this morning that I might add some lazy daisy stitches between the fans... we'll see.

I'm really enjoying the 100 Details in 100 Days. It's kinda like I've been given bits and pieces of a puzzle and I can make my own picture with them. Very cool... I love studying Sharon's picture and post, then letting it percolate thru my own creative screen and watching what comes out the other side. Fun times!!